don't use combinalty mode keep it into don't combine
and mark any column as primary key
it should almost solve the issue but not 100%
Monday, September 27, 2010

Wednesday, September 1, 2010
Hard RESET combination for NOKIA 5800
Press and hold GREEN + RED + CAMERA when powering up.
Keep the keys pressed until you get the shaking hands. That should fully reset the device, with a lock code of 12345.
This is only available on phones with 20.0.012 or later.
Keep the keys pressed until you get the shaking hands. That should fully reset the device, with a lock code of 12345.
This is only available on phones with 20.0.012 or later.
Saturday, August 14, 2010
How to troubleshoot the "NTLDR is missing" error message
When you start your Windows Server 2003-based computer, you may receive the following error message:
NTLDR is missing
Press any key to restart
This problem may occur if the basic input/output system (BIOS) on your computer is outdated, or if one or more of the following Windows boot files are missing or damaged:
Ntldr
Ntdetect.com
Boot.ini
To resolve this issue, verify that the BIOS on your computer is current, and then use one or more of the following methods, depending on your situation, to repair the Windows Server 2003 Startup environment.
Important To prevent data loss, Microsoft recommends that you fully back up your data periodically. The backup of data must be a part of any disaster recovery plan.
Verify that the BIOS on the computer is current
Make sure that the latest revision for BIOS is installed on the computer. Contact the computer manufacturer for information about how to obtain and install the latest BIOS update that is available for the computer.
For information about how to configure and to verify the correct BIOS settings for the computer, see the computer documentation or contact the manufacturer of the computer.
For information about how to contact your hardware vendor, visit the following Microsoft Web site:
http://support.microsoft.com/gp/vendors
For more information about how to contact BIOS manufacturers, click the following article numbers to view the articles in the Microsoft Knowledge Base:
243909 List of BIOS manufacturer Web site, part 1
243971 List of BIOS manufacturer Web sites, part 2
Back to the top
Repair the Windows Startup environment
To repair the Windows startup environment, use one or more of the following methods, depending on your situation.
Method 1: Use a boot disk
To use a boot disk to repair the Windows Startup environment, follow these steps:
Create a Windows Server 2003 boot disk that contains the following files:
Ntldr
Ntdetect.com
Boot.ini
Ntbootdd.sys
Note Ntbootdd.sys may not be included on all Windows Server 2003 computers.
For more information about how to create a boot disk, click the following article numbers to view the articles in the Microsoft Knowledge Base:
301680 How to create a boot disk for an NTFS or FAT partition in Windows
101668 How to use a Windows boot disk to prevent boot failure in Windows 2000 or Windows NT
Modify the Boot.ini file to point to the correct hard disk controller and to the correct volume for your Windows installation.
For more information about how to modify the Boot.ini file, click the following article number to view the article in the Microsoft Knowledge Base:
323427 How to manually edit the Boot.ini file in a Windows Server 2003 environment
Insert the boot disk into the floppy disk drive, and then restart the computer.
Copy the Ntldr file, the Ntdetect.com file, and the Boot.ini file from the boot disk to the system partition of the local hard disk.
Method 2: Use the Recovery Console
Microsoft provides programming examples for illustration only, without warranty either expressed or implied, including, but not limited to, the implied warranties of merchantability and/or fitness for a particular purpose. This article assumes that you are familiar with the programming language being demonstrated and the tools used to create and debug procedures. Microsoft support professionals can help explain the functionality of a particular procedure, but they will not modify these examples to provide added functionality or construct procedures to meet your specific needs.
If you have limited programming experience, you may want to contact a Microsoft Certified Partner or Microsoft Advisory Services. For more information, visit these Microsoft Web sites:
Microsoft Certified Partners - https://partner.microsoft.com/global/30000104
Microsoft Advisory Services - http://support.microsoft.com/gp/advisoryservice
For more information about the support options that are available and about how to contact Microsoft, visit the following Microsoft Web site:http://support.microsoft.com/default.aspx?scid=fh;EN-US;CNTACTMS To use the Recovery Console to repair the Windows Startup environment, follow these steps:
Use the Windows Server 2003 CD-ROM to restart the computer.
At the Welcome to Setup screen, press R to repair the Windows Server 2003 installation.
To use the Recovery Console to repair the Windows Server 2003 installation, press C.
Type the number that corresponds to the Windows installation that you want to repair, and then press ENTER. For more information about the Recovery Console, see the "Recovery Console overview" topic in Windows Server 2003 Help and Support Center.
Type the Administrator password, and then press ENTER.
Type map, and then press ENTER. Make a note of the drive letter that is assigned to the CD-ROM drive that contains the Windows Server 2003 CD-ROM.
Type:
copy Drive:\i386\ntldr c:\
NoteDrive is the drive letter that you noted in step 6, and then press ENTER.
Type:
copy drive:\i386\ntdetect.com c:\
If you are prompted to overwrite the file, type y, and then press ENTER.
Note In these commands, a space exists between ntldr and c:\, and between ntdetect.com and c:\.
Type the following command, and then press ENTER:
type c:\Boot.ini
A list that is similar to the following list appears:
[boot loader]
timeout=30
default=multi(0)disk(0)rdisk(0)partition(1)\WINDOWS
[operating systems]
multi(0)disk(0)rdisk(0)partition(1)\WINDOWS="Microsoft Windows Server 2003, Standard" /fastdetect
If you receive the following error message, the Boot.ini file may be missing or damaged:
The system cannot find the file or directory specified.
If the Boot.ini file is missing or damaged, re-create it. To do so, follow these steps:
Use a text editor, such as Notepad or Edit.com, to create a boot loader file that is similar to the following boot loader file:
[boot loader]
timeout=30
default=multi(0)disk(0)rdisk(0)partition(1)\WINDOWS
[operating systems]
multi(0)disk(0)rdisk(0)partition(1)\WINDOWS="Microsoft Windows Server 2003, Standard" /fastdetect
For more information, click the following article number to view the article in the Microsoft Knowledge Base:
102873 BOOT.INI and ARC path naming conventions and usage
Save the file to a floppy disk. When you do so, in the Save As box, type:
Boot.ini
Note If you used Notepad to create the file, make sure that the .txt extension is not appended to the Boot.ini file name.
Type the following command at the Recovery Console command prompt to copy the Boot.ini file from the floppy disk to the computer:
copy a:\Boot.ini c:\
Type exit, and then press ENTER. The computer restarts.
Method 3: Use the Windows Server 2003 CD-ROM
To use the Windows Server 2003 CD-ROM to repair the Windows Startup environment, follow these steps:
Insert the Windows Server 2003 CD-ROM into the CD-ROM drive or into the DVD-ROM drive, and then start Windows Server 2003 Setup.
On the Welcome to Setup page, press the R key.
On the Windows Server 2003 Repair Options page, press R.
When you are prompted to select one of the repair options, press M.
To select Verify Windows Server 2003 system files, press the UP ARROW two times, and then press ENTER..
Press the DOWN ARROW to select Continue (perform selected tasks), and then press ENTER. You receive the following message:
You need an Emergency Repair disk for the Windows Server 2003
installation you want to repair.
Use one of the following methods, as appropriate to your situation:
If you have an emergency repair disk, follow these steps:
Press ENTER.
Insert the emergency repair disk into the floppy disk drive, and then press ENTER.
Follow the instructions that appear on the screen to repair the installation, and then restart the computer.
If you do not have an emergency repair disk, follow these steps:
Press L. You receive a message that is similar to the following message:
Setup has found Windows Server 2003 in the following folder:
drive:\WINDOWS "Microsoft Windows Server 2003"
Press ENTER.
Setup examines the disks, and then finishes the repair.
The Setup program cannot locate the Windows Server 2003 installation
If the Setup program cannot locate the Windows Server 2003 installation, follow these steps:
Start Windows Server 2003 Setup.
On the Setup will install Windows Server 2003 on partition page, use the ARROW keys to select Leave the current file system intact (no changes), and then press ENTER.
Press ESC to install Windows Server 2003 to a new folder.
In the Select the folder in which the files should be copied box, type \tempwin, and then press ENTER.
Setup installs a new copy of Windows Server 2003.
Log on to the new copy of Windows Server 2003.
Click Start, and then click Run.
In the Open box, type cmd, and then click OK.
At the command prompt, type the following command, and then press ENTER:
drive:
Note In the command, drive is the boot drive of the computer. For example, type c:, and then press ENTER.
Type the following command, and then press ENTER:
attrib -h -r -s Boot.ini
Type the following command, and then press ENTER:
edit Boot.ini
Edit.com opens a Boot.ini file that is similar to the following file:
[boot loader]
timeout=30
default=multi(0)disk(0)rdisk(0)partition(1)\TEMPWIN
[operating systems]
multi(0)disk(0)rdisk(0)partition(1)\TEMPWIN="Microsoft Windows Server 2003, Standard" /fastdetect
In the Boot.ini file, replace all instances of "TEMPWIN" with "WINDOWS". A Boot.ini file appears that is similar to the following file:
[boot loader]
timeout=30
default=multi(0)disk(0)rdisk(0)partition(1)\WINDOWS
[operating systems]
multi(0)disk(0)rdisk(0)partition(1)\WINDOWS="Microsoft Windows Server 2003, Standard" /fastdetect
Press ALT+F, and then press S.
Press ALT+F, and then press X.
Type the following command, and then press ENTER:
attrib +h +r +s Boot.ini
Type exit, and then press ENTER to quit the command prompt.
Restart the computer.
At the Please select the operating system to start screen, use the ARROW keys to select Microsoft Windows Server 2003, and then press ENTER.
Start Windows Explorer, locate the following folders, and then delete them:
Tempwin
All Users.Tempwin
For more information, click the following article number to view the article in the Microsoft Knowledge Base:
228004 Changing active partition can make your system unbootable
NTLDR is missing
Press any key to restart
This problem may occur if the basic input/output system (BIOS) on your computer is outdated, or if one or more of the following Windows boot files are missing or damaged:
Ntldr
Ntdetect.com
Boot.ini
To resolve this issue, verify that the BIOS on your computer is current, and then use one or more of the following methods, depending on your situation, to repair the Windows Server 2003 Startup environment.
Important To prevent data loss, Microsoft recommends that you fully back up your data periodically. The backup of data must be a part of any disaster recovery plan.
Verify that the BIOS on the computer is current
Make sure that the latest revision for BIOS is installed on the computer. Contact the computer manufacturer for information about how to obtain and install the latest BIOS update that is available for the computer.
For information about how to configure and to verify the correct BIOS settings for the computer, see the computer documentation or contact the manufacturer of the computer.
For information about how to contact your hardware vendor, visit the following Microsoft Web site:
http://support.microsoft.com/gp/vendors
For more information about how to contact BIOS manufacturers, click the following article numbers to view the articles in the Microsoft Knowledge Base:
243909 List of BIOS manufacturer Web site, part 1
243971 List of BIOS manufacturer Web sites, part 2
Back to the top
Repair the Windows Startup environment
To repair the Windows startup environment, use one or more of the following methods, depending on your situation.
Method 1: Use a boot disk
To use a boot disk to repair the Windows Startup environment, follow these steps:
Create a Windows Server 2003 boot disk that contains the following files:
Ntldr
Ntdetect.com
Boot.ini
Ntbootdd.sys
Note Ntbootdd.sys may not be included on all Windows Server 2003 computers.
For more information about how to create a boot disk, click the following article numbers to view the articles in the Microsoft Knowledge Base:
301680 How to create a boot disk for an NTFS or FAT partition in Windows
101668 How to use a Windows boot disk to prevent boot failure in Windows 2000 or Windows NT
Modify the Boot.ini file to point to the correct hard disk controller and to the correct volume for your Windows installation.
For more information about how to modify the Boot.ini file, click the following article number to view the article in the Microsoft Knowledge Base:
323427 How to manually edit the Boot.ini file in a Windows Server 2003 environment
Insert the boot disk into the floppy disk drive, and then restart the computer.
Copy the Ntldr file, the Ntdetect.com file, and the Boot.ini file from the boot disk to the system partition of the local hard disk.
Method 2: Use the Recovery Console
Microsoft provides programming examples for illustration only, without warranty either expressed or implied, including, but not limited to, the implied warranties of merchantability and/or fitness for a particular purpose. This article assumes that you are familiar with the programming language being demonstrated and the tools used to create and debug procedures. Microsoft support professionals can help explain the functionality of a particular procedure, but they will not modify these examples to provide added functionality or construct procedures to meet your specific needs.
If you have limited programming experience, you may want to contact a Microsoft Certified Partner or Microsoft Advisory Services. For more information, visit these Microsoft Web sites:
Microsoft Certified Partners - https://partner.microsoft.com/global/30000104
Microsoft Advisory Services - http://support.microsoft.com/gp/advisoryservice
For more information about the support options that are available and about how to contact Microsoft, visit the following Microsoft Web site:http://support.microsoft.com/default.aspx?scid=fh;EN-US;CNTACTMS To use the Recovery Console to repair the Windows Startup environment, follow these steps:
Use the Windows Server 2003 CD-ROM to restart the computer.
At the Welcome to Setup screen, press R to repair the Windows Server 2003 installation.
To use the Recovery Console to repair the Windows Server 2003 installation, press C.
Type the number that corresponds to the Windows installation that you want to repair, and then press ENTER. For more information about the Recovery Console, see the "Recovery Console overview" topic in Windows Server 2003 Help and Support Center.
Type the Administrator password, and then press ENTER.
Type map, and then press ENTER. Make a note of the drive letter that is assigned to the CD-ROM drive that contains the Windows Server 2003 CD-ROM.
Type:
copy Drive:\i386\ntldr c:\
NoteDrive is the drive letter that you noted in step 6, and then press ENTER.
Type:
copy drive:\i386\ntdetect.com c:\
If you are prompted to overwrite the file, type y, and then press ENTER.
Note In these commands, a space exists between ntldr and c:\, and between ntdetect.com and c:\.
Type the following command, and then press ENTER:
type c:\Boot.ini
A list that is similar to the following list appears:
[boot loader]
timeout=30
default=multi(0)disk(0)rdisk(0)partition(1)\WINDOWS
[operating systems]
multi(0)disk(0)rdisk(0)partition(1)\WINDOWS="Microsoft Windows Server 2003, Standard" /fastdetect
If you receive the following error message, the Boot.ini file may be missing or damaged:
The system cannot find the file or directory specified.
If the Boot.ini file is missing or damaged, re-create it. To do so, follow these steps:
Use a text editor, such as Notepad or Edit.com, to create a boot loader file that is similar to the following boot loader file:
[boot loader]
timeout=30
default=multi(0)disk(0)rdisk(0)partition(1)\WINDOWS
[operating systems]
multi(0)disk(0)rdisk(0)partition(1)\WINDOWS="Microsoft Windows Server 2003, Standard" /fastdetect
For more information, click the following article number to view the article in the Microsoft Knowledge Base:
102873 BOOT.INI and ARC path naming conventions and usage
Save the file to a floppy disk. When you do so, in the Save As box, type:
Boot.ini
Note If you used Notepad to create the file, make sure that the .txt extension is not appended to the Boot.ini file name.
Type the following command at the Recovery Console command prompt to copy the Boot.ini file from the floppy disk to the computer:
copy a:\Boot.ini c:\
Type exit, and then press ENTER. The computer restarts.
Method 3: Use the Windows Server 2003 CD-ROM
To use the Windows Server 2003 CD-ROM to repair the Windows Startup environment, follow these steps:
Insert the Windows Server 2003 CD-ROM into the CD-ROM drive or into the DVD-ROM drive, and then start Windows Server 2003 Setup.
On the Welcome to Setup page, press the R key.
On the Windows Server 2003 Repair Options page, press R.
When you are prompted to select one of the repair options, press M.
To select Verify Windows Server 2003 system files, press the UP ARROW two times, and then press ENTER..
Press the DOWN ARROW to select Continue (perform selected tasks), and then press ENTER. You receive the following message:
You need an Emergency Repair disk for the Windows Server 2003
installation you want to repair.
Use one of the following methods, as appropriate to your situation:
If you have an emergency repair disk, follow these steps:
Press ENTER.
Insert the emergency repair disk into the floppy disk drive, and then press ENTER.
Follow the instructions that appear on the screen to repair the installation, and then restart the computer.
If you do not have an emergency repair disk, follow these steps:
Press L. You receive a message that is similar to the following message:
Setup has found Windows Server 2003 in the following folder:
drive:\WINDOWS "Microsoft Windows Server 2003"
Press ENTER.
Setup examines the disks, and then finishes the repair.
The Setup program cannot locate the Windows Server 2003 installation
If the Setup program cannot locate the Windows Server 2003 installation, follow these steps:
Start Windows Server 2003 Setup.
On the Setup will install Windows Server 2003 on partition page, use the ARROW keys to select Leave the current file system intact (no changes), and then press ENTER.
Press ESC to install Windows Server 2003 to a new folder.
In the Select the folder in which the files should be copied box, type \tempwin, and then press ENTER.
Setup installs a new copy of Windows Server 2003.
Log on to the new copy of Windows Server 2003.
Click Start, and then click Run.
In the Open box, type cmd, and then click OK.
At the command prompt, type the following command, and then press ENTER:
drive:
Note In the command, drive is the boot drive of the computer. For example, type c:, and then press ENTER.
Type the following command, and then press ENTER:
attrib -h -r -s Boot.ini
Type the following command, and then press ENTER:
edit Boot.ini
Edit.com opens a Boot.ini file that is similar to the following file:
[boot loader]
timeout=30
default=multi(0)disk(0)rdisk(0)partition(1)\TEMPWIN
[operating systems]
multi(0)disk(0)rdisk(0)partition(1)\TEMPWIN="Microsoft Windows Server 2003, Standard" /fastdetect
In the Boot.ini file, replace all instances of "TEMPWIN" with "WINDOWS". A Boot.ini file appears that is similar to the following file:
[boot loader]
timeout=30
default=multi(0)disk(0)rdisk(0)partition(1)\WINDOWS
[operating systems]
multi(0)disk(0)rdisk(0)partition(1)\WINDOWS="Microsoft Windows Server 2003, Standard" /fastdetect
Press ALT+F, and then press S.
Press ALT+F, and then press X.
Type the following command, and then press ENTER:
attrib +h +r +s Boot.ini
Type exit, and then press ENTER to quit the command prompt.
Restart the computer.
At the Please select the operating system to start screen, use the ARROW keys to select Microsoft Windows Server 2003, and then press ENTER.
Start Windows Explorer, locate the following folders, and then delete them:
Tempwin
All Users.Tempwin
For more information, click the following article number to view the article in the Microsoft Knowledge Base:
228004 Changing active partition can make your system unbootable
Saturday, July 24, 2010
How to Delete an Internet Cache on Ubuntu
The Internet cache (also known as temporary Internet files) is used to speed up the loading of web pages. When a web page is opened, it is placed in the Internet cache on your computer. When you access the site a second time the page is loaded from the cache unless it has been modified. This reduces the time needed to open the file. Ubuntu uses the Firefox web browser by default. The location of the Internet cache files are located in within the "Firefox" directory on your hard drive.
Difficulty: Easy
Instructions
Graphical
Step 1
Click on the "Places" menu in the tool bar at the top of the page.
Step 2
Click on the "Home Folder" icon.
Step 3
Click on the "View" menu at the top of the "Home Folder" window.
Step 4
Click the check box next to "Show Hidden Files." You can also press the "Ctrl" key and the "H" key at the same time from within the "Home Folder" window.
Step 5
Double-click on the ".mozilla" folder.
Step 6
Double click on the "firefox" folder.
Step 7
Double click on the folder with the ".default" extension. The complete folder name will be something like: "ciab0l6t.default".
Step 8
Double-click on the "Cache" folder.
Step 9
Press the "Ctrl" key and the "A" key simultaneously to select all the files within the cache folder.
Step 10
Right click anywhere in the folder and select "Move to trash."
Step 11
Right click on the "Trash" icon on the desktop and choose "Empty Trash" to delete the files.
Command Line
Step 1
Open a terminal window. The terminal window will be found under "Accessories" in the "Applications" menu.
Step 2
Type the command "cd .mozilla/firefox/" to navigate into the firefox directory.
Step 3
Type the command "ls" to list the contents of the firefox directory. Note the exact name of the directory with the ".default" file extension. The complete directory name will be something like: "ciab0l6t.default".
Step 4
Type the command "cd ciab0l6t.default/Cache" to navigate into the "Cache" directory. Replace "ciab0l6t.default" with the directory name from Step 3.
Step 5
Type the command "rm *" to delete the contents of the "Cache" directory.
By Kristen Leigh Grubb, eHow Contributing Writer
Difficulty: Easy
Instructions
Graphical
Step 1
Click on the "Places" menu in the tool bar at the top of the page.
Step 2
Click on the "Home Folder" icon.
Step 3
Click on the "View" menu at the top of the "Home Folder" window.
Step 4
Click the check box next to "Show Hidden Files." You can also press the "Ctrl" key and the "H" key at the same time from within the "Home Folder" window.
Step 5
Double-click on the ".mozilla" folder.
Step 6
Double click on the "firefox" folder.
Step 7
Double click on the folder with the ".default" extension. The complete folder name will be something like: "ciab0l6t.default".
Step 8
Double-click on the "Cache" folder.
Step 9
Press the "Ctrl" key and the "A" key simultaneously to select all the files within the cache folder.
Step 10
Right click anywhere in the folder and select "Move to trash."
Step 11
Right click on the "Trash" icon on the desktop and choose "Empty Trash" to delete the files.
Command Line
Step 1
Open a terminal window. The terminal window will be found under "Accessories" in the "Applications" menu.
Step 2
Type the command "cd .mozilla/firefox/" to navigate into the firefox directory.
Step 3
Type the command "ls" to list the contents of the firefox directory. Note the exact name of the directory with the ".default" file extension. The complete directory name will be something like: "ciab0l6t.default".
Step 4
Type the command "cd ciab0l6t.default/Cache" to navigate into the "Cache" directory. Replace "ciab0l6t.default" with the directory name from Step 3.
Step 5
Type the command "rm *" to delete the contents of the "Cache" directory.
By Kristen Leigh Grubb, eHow Contributing Writer
Friday, July 23, 2010
laptop screen randomly dims in ubuntu
There is another place to set gnome power manager options:
Start Gconf-editor:
Alt-F2 > type gconf-editor> run
Select apps menu > gnome-power-manager
There are some options to try:
- dim-on-idle
- backlight menu > idle-...
Now, notebooks have very specific hardware that have specific issues. Some options in some computer still don't work
Start Gconf-editor:
Alt-F2 > type gconf-editor> run
Select apps menu > gnome-power-manager
There are some options to try:
- dim-on-idle
- backlight menu > idle-...
Now, notebooks have very specific hardware that have specific issues. Some options in some computer still don't work
__________________
Thursday, July 22, 2010
ORACLE CONFIGURATION IN UBUNTU 10.04
Q. How do I install Oracle Database XE Server on my Ubuntu Linux desktop system?
A. An Oracle database consists of a collection of data managed by an Oracle database management system. You can download Oracle Database XE server for Debian, Mandriva, Novell, Red Hat and Ubuntu Linux distributions. First you need to get databases up and running in order to use Oracle. The Oracle database has had a reputation among new Linux users as difficult to install on Linux systems. Now Oracle Corporation has packaged recent versions for several popular Linux distributions in an attempt to minimize installation challenges beyond the level of technical expertise required to install a database server.
Append following line:
Save and close the file. Next import GPG key:
Update package database:
Finally install Oracle:
Output:
Output:
A. An Oracle database consists of a collection of data managed by an Oracle database management system. You can download Oracle Database XE server for Debian, Mandriva, Novell, Red Hat and Ubuntu Linux distributions. First you need to get databases up and running in order to use Oracle. The Oracle database has had a reputation among new Linux users as difficult to install on Linux systems. Now Oracle Corporation has packaged recent versions for several popular Linux distributions in an attempt to minimize installation challenges beyond the level of technical expertise required to install a database server.
Make sure you have enough disk space and memory
If you have less than 1GB memory run the following commands to create swap space:$ sudo dd if=/dev/zero of=/swpfs1 bs=1M count=1000
$ sudo mkswap /swpfs1
$ sudo swapon /swpfs1Debian / Ubuntu Oracle installation
First modify /etc/apt/sources.list file:$ sudo vi /etc/apt/sources.listAppend following line:
deb http://oss.oracle.com/debian unstable main non-freeSave and close the file. Next import GPG key:
$ wget http://oss.oracle.com/el4/RPM-GPG-KEY-oracle -O- | sudo apt-key add - Update package database:
$ sudo apt-get updateFinally install Oracle:
$ sudo apt-get install oracle-xeOutput:
Reading package lists... Done
Building dependency tree
Reading state information... Done
The following packages were automatically installed and are no longer required:
  linux-headers-2.6.20-15-generic linux-headers-2.6.20-15
Use 'apt-get autoremove' to remove them.
The following extra packages will be installed:
  libaio
The following NEW packages will be installed:
  libaio oracle-xe
0 upgraded, 2 newly installed, 0 to remove and 2 not upgraded.
Need to get 221MB/221MB of archives.
After unpacking 405MB of additional disk space will be used.
Do you want to continue [Y/n]? y
Get:1 http://oss.oracle.com unstable/non-free oracle-xe 10.2.0.1-1.1 [221MB]
....
....
Post-install configuration
You must configure Oracle TCP/IP port and other parameters. Simply type the following command:$ sudo /etc/init.d/oracle-xe configureOutput:
Oracle Database 10g Express Edition Configuration ------------------------------------------------- This will configure on-boot properties of Oracle Database 10g Express Edition. The following questions will determine whether the database should be starting upon system boot, the ports it will use, and the passwords that will be used for database accounts. PressTo access the Database Home Page go to http://127.0.0.1:8080/apex. Open a web browser and type url (you need to use username "system" and password setup earlier)to accept the defaults. Ctrl-C will abort. Specify the HTTP port that will be used for Oracle Application Express [8080]: [Enter key] Specify a port that will be used for the database listener [1521]:[Enter key] Specify a password to be used for database accounts. Note that the same password will be used for SYS and SYSTEM. Oracle recommends the use of different passwords for each database account. This can be done after initial configuration:secret Confirm the password:secret Do you want Oracle Database 10g Express Edition to be started on boot (y/n) [y]:y Starting Oracle Net Listener...Done Configuring Database...Done Starting Oracle Database 10g Express Edition Instance...Done Installation Completed Successfully. To access the Database Home Page go to "http://127.0.0.1:8080/apex"
Friday, January 1, 2010
PALM PRE TREO phone

I was so nervous and excited as i ordered the new palm pre treo unlocked phone as i don't know whether it works with AT & T or not. But in two words it is simply excellent
UBUNTU 9.10 is the best version i have ever seen

Thanks for the open source creator for creating such a flexible options and many ways to personalize our selves. This entire aggrandize is as i started using UBUNTU 9.10 which made everything easy for me and all i require is only connecting it once to the wired internet for upgrading its firmware for my lappy i don't know how it works for other manufacturers( i am on dell).
But i am sad in one angle as i now don't have much work to try on it or test on it now it became a cake walk for me using ubuntu 9.10 anyways for all the future endeavors i wish UBUNTU guys a big success and happy new year
Thursday, December 3, 2009
UBUNTU AND DELL INSPIRON 1525 f**k man they are born rivals i guess
Hi guys, I was now trying to mess my laptop with all the possible ways. as i am more towards open source coz they give you the freedom ur looking for and which i want. And as a noob i prefer using ubuntu as my standard linux operating system which i personally suggest you all to use if you prefer playing with OS. and in this installation i got another problem which is my Dell 1395 wireless card. Linux specially ubuntu is still not supporting this Dell Wireless card. And here in my Univ i will be desparately looking for wi- fi spots than lan. so i thought to struggle some how and get it connected and i suceeded atlast.
Now i am giving the steps of making your wireless card enabled for networking.
first the process is we use ndiswrapper to use our windows version of devise driver software and work it with ubuntu
After trying many different approaches suggested all over the web, and gathering clues in many Ubuntu forum posts, I finally worked out this solution:
1. blacklist bcm43xx
echo 'blacklist bcm43xx' | sudo tee -a /etc/modprobe.d/blacklist
2. install ndiswrapper and related files
sudo apt-get install ndiswrapper-common ndisgtk
(this should also pull in the 'utils' package)
when I was all said and done, I had
ndiswrapper 1.45
ndiswrapper-utils 1.9
ndisgtk (you don't really need this, and my instructions don't make use of it)
3. download and extract http://ftp.us.dell.com/network/R174291.exe
this is a ridiculous bit of bloat, but the most complete INF for 43xx devices
4. go into folder DRIVER_US inside the result of what you did above
5. use ndiswrapper to install bcmwl5.inf
sudo ndiswrapper -i bcmwl5.inf
sudo ndiswrapper -m (this one will give you a bunch of warnings - ignore)
sudo ndiswrapper -ma
sudo ndiswrapper -mi
(I don't honestly know if the last three steps are necessary, but can't hurt)
6. reboot your machine
Now i am giving the steps of making your wireless card enabled for networking.
first the process is we use ndiswrapper to use our windows version of devise driver software and work it with ubuntu
After trying many different approaches suggested all over the web, and gathering clues in many Ubuntu forum posts, I finally worked out this solution:
1. blacklist bcm43xx
echo 'blacklist bcm43xx' | sudo tee -a /etc/modprobe.d/blacklist
2. install ndiswrapper and related files
sudo apt-get install ndiswrapper-common ndisgtk
(this should also pull in the 'utils' package)
when I was all said and done, I had
ndiswrapper 1.45
ndiswrapper-utils 1.9
ndisgtk (you don't really need this, and my instructions don't make use of it)
3. download and extract http://ftp.us.dell.com/network/R174291.exe
this is a ridiculous bit of bloat, but the most complete INF for 43xx devices
4. go into folder DRIVER_US inside the result of what you did above
5. use ndiswrapper to install bcmwl5.inf
sudo ndiswrapper -i bcmwl5.inf
sudo ndiswrapper -m (this one will give you a bunch of warnings - ignore)
sudo ndiswrapper -ma
sudo ndiswrapper -mi
(I don't honestly know if the last three steps are necessary, but can't hurt)
6. reboot your machine
Saturday, October 24, 2009
Atlast back
Hi guys i am back after a long time. Now i am in US and doing my thesis and struggling a bit for my living and things. Anyways how are you guys doing?
Tuesday, December 11, 2007
TOEFL links for test
hi was busy with applying to US univs and learned much
http://toefl-material.blogspot.com/search?updated-min=2007-01-01T00%3A00%3A00-08%3A00
&updated-max=2008-01-01T00%3A00%3A00-08%3A00&max-results=20
this is the toefl AIO link get downloaded and practice well
http://toefl-material.blogspot.com/search?updated-min=2007-01-01T00%3A00%3A00-08%3A00
&updated-max=2008-01-01T00%3A00%3A00-08%3A00&max-results=20
this is the toefl AIO link get downloaded and practice well
Friday, November 9, 2007
ANTI VIRUS!!!!!!!!!!!!!!!!
Hi friends
i am back,Now a days i have seen many of my friends worrying about virus attacks on their systems,So i thought to do something in order to solve or even try to do this.
here i provide some anti virus software and their needs
NORTON ANTI VIRUS

Features
* Improved performance delivers faster scans NEW
* One click access to expert support NEW
* Works quietly in the background. NEW
* Network mapping provides a view of your home network. NEW
* Detects and removes spyware and viruses
* Blocks spyware and worms automatically
* Protects email and instant messaging from viruses
* Prevents virus-infected emails from spreading
* Rootkit detection finds and removes hidden threats
* Includes protection updates and new product features as available throughout the renewable service period *
SYSTEM REQUIREMENTS
Windows Vista® Home Basic/ Home Premium/Business/Ultimate**
Windows® XP with Service Pack 2 Home/XP Pro/XP Media Center Edition
* 300MHz or higher processor
* 256MB of RAM
* 300MB of available hard disk space
** Must meet minimum Windows Vista operating system requirements.
Email scanning supported for POP3 and SMTP compatible email clients.
Supported instant messenger clients:
* AOL® – 4.7 to 5.9
* Yahoo!® – 5.x and 6.x
* Microsoft® – 6.0 or higher
* Trillian™ – 3.1 or higher
AVAST ANTI VIRUS:

Features:
* Standard Shield — Real-time protection
* IM shield — Instant Messenger protection
* P2P shield — P2P protection
* Internet Mail — E-mail protection
* Outlook/Exchange — Microsoft Outlook/Exchange protection
* Web Shield — HTTP protection (localtransparent proxy)
* Script blocker — script checker (Pro version only)
* Network Shield — basic protection against well-known network worms. Acts as a lightweight Intrusion Detection System
* Audible alarms — vocal warnings such as "Caution, a virus has been detected!"
* Boot-time scan — through the program interface, a user can schedule a boot-time scan to remove viruses that load during Windows startup and are therefore difficult to remove.
AVG ANTIVIRUS

All-In-One Protection
* Anti-Virus protects from viruses, worms and trojans
* Anti-Spyware protects from spyware, adware and other malicious programs
* Anti-Spam filters spam and protects against phishing attacks
* Firewall protects from hackers
Features
* All-in-one, easy to use protection - install and forget
* New program versions and updates automatically applied for free for the duration of your subscription
* Quality proven by all major antivirus certifications (VB100%, ICSA, West Coast Labs Checkmark)
* 24/7 technical support provided at no extra cost
* Improved virus detection based on better heuristics and NTFS data streams scanning
* Unique automatic threat-removal anti-spyware engine
* Automatic firewall profile switching for improved security and usability
* 100% virus detection — AVG’s scanning engine has received numerous awards for its excellent detection of “in the wild” viruses, including the VB100% award. Its unique combination of detection methods provides full protection against viruses, worms and trojans.
* Cutting-edge anti-spyware technology — Using the latest state-of-the-art detection technology, AVG detects spyware, adware, DLL-trojans, keyloggers, and much more. Malware hidden in data streams, archives, or the Windows registry is also detected.
* Full on-access protection — The powerful AVG Resident Shield provides maximum protection by scanning every file opened, executed, or saved. It also prevents the opening or executing of infected files.
* Flexible intelligent scanning — The AVG Resident Shield can include/exclude files from being scanned based on individual file extensions and can handle exceptions for potentially unwanted programs such as adware.
* Full e-mail protection — AVG checks every e-mail sent or received, providing full protection from e-mail-borne threats. AVG supports all leading e-mail clients, including MS Outlook, The bat!, Eudora, and all other SMTP/POP3-based e-mail clients, such as Outlook Express. Encrypted connections using SSL are also supported.
* E-mail spam and phishing filtering — AVG checks every e-mail received, using the latest technology and up-to-the-minute spam signatures to ensure maximum detection rates for spam and phishing attacks.
* Automatic threat handling — AVG can automatically heal or remove infected files and other threats such as trojans, worms and spyware.
* Control over all network access — The AVG Firewall monitors all communication to and from the computer, blocking external attacks and preventing trojans from exporting confidential data. The AVG Firewall configuration wizard automatically creates access rules for all popular software. In addition the firewall can switch profiles automatically, based upon the current conection type, ensuring seamless changeover for notebooks.
* Powerful scheduling — AVG automatically provides recommended daily schedules for scanning and updating, and also allows you to create custom-scheduled events.
* Multiple language support — No need to buy a special language version.
Supported platforms
Platform
[Operating System] AVG Internet Security
MS Windows 98 * Yes
MS Windows Me * Yes
MS Windows NT * Yes
MS Windows 2000 Yes
MS Windows XP Yes
MS Windows XP Pro x64 Edition Yes
MS Windows Vista Yes
MS Windows Vista x64 Edition Yes
MS Windows NT Server 4.0 No
MS Windows 2000 Server No
MS Windows 2003 Server No
MS Windows 2003 Server x64 Edition No
Linux i386 No
FreeBSD No
Symbian No
Platform
[Application]
MS Exchange Server 5.x No
MS Exchange Server 2000/2003 No
MS Exchange Server 2007 No
Kerio MailServer 5/6 (MS Windows) No
Kerio MailServer 5/6 (Linux i386) No
Lotus Domino (MS Windows) No
Lotus Domino (Linux i386) No
PostFix No
QMail No
SendMail No
Exim No
Important notice
* * Operating systems marked with an asterisk (MS Windows 98, MS Windows ME and MS Windows NT) will only be supported until August 2008.
* Anti-Spyware on-access scanner is available only on Windows 2000 SP4 + Update Rollup 1, Windows XP SP2, Windows XP Pro x64 Edition SP1 and Windows Vista/Vista x64 Edition.
Free Customer Support
* AVG's world-class product support is provided at no extra cost to all registered AVG customers.
* 24/7 technical support by e-mail
* FAQ and online documentation
* Up-to-the-minute updates available "around-the-clock" as AVG virus experts react rapidly to new and emerging threats. High speed delivery via worldwide networks guarantees maximum protection levels for users.
Minimum System Requirements
* Windows Vista, Windows XP, Windows 2000, Windows NT, Windows Me, Windows 98. Note: AVG home and small office products do not have support for server operating systems (Windows NT Server, Windows 2000/2003 Server, etc.). If you are interested in server protection, please continue with Small Business solutions.
* 1,2 GHz Processor
* 70 MB free hard drive space
* 256 MB RAM
Licensing
* AVG Internet Security requires 1 license per computer and can be purchased in packs for 1,2,3 and 5 computers.
* Licenses can be purchased for 1 or 2 years.
* Each license includes all program and database updates and full technical support for the license duration.
* For more information and special licensing please contact Sales Support.
i am back,Now a days i have seen many of my friends worrying about virus attacks on their systems,So i thought to do something in order to solve or even try to do this.
here i provide some anti virus software and their needs
NORTON ANTI VIRUS

Features
* Improved performance delivers faster scans NEW
* One click access to expert support NEW
* Works quietly in the background. NEW
* Network mapping provides a view of your home network. NEW
* Detects and removes spyware and viruses
* Blocks spyware and worms automatically
* Protects email and instant messaging from viruses
* Prevents virus-infected emails from spreading
* Rootkit detection finds and removes hidden threats
* Includes protection updates and new product features as available throughout the renewable service period *
SYSTEM REQUIREMENTS
Windows Vista® Home Basic/ Home Premium/Business/Ultimate**
Windows® XP with Service Pack 2 Home/XP Pro/XP Media Center Edition
* 300MHz or higher processor
* 256MB of RAM
* 300MB of available hard disk space
** Must meet minimum Windows Vista operating system requirements.
Email scanning supported for POP3 and SMTP compatible email clients.
Supported instant messenger clients:
* AOL® – 4.7 to 5.9
* Yahoo!® – 5.x and 6.x
* Microsoft® – 6.0 or higher
* Trillian™ – 3.1 or higher
AVAST ANTI VIRUS:

Features:
* Standard Shield — Real-time protection
* IM shield — Instant Messenger protection
* P2P shield — P2P protection
* Internet Mail — E-mail protection
* Outlook/Exchange — Microsoft Outlook/Exchange protection
* Web Shield — HTTP protection (localtransparent proxy)
* Script blocker — script checker (Pro version only)
* Network Shield — basic protection against well-known network worms. Acts as a lightweight Intrusion Detection System
* Audible alarms — vocal warnings such as "Caution, a virus has been detected!"
* Boot-time scan — through the program interface, a user can schedule a boot-time scan to remove viruses that load during Windows startup and are therefore difficult to remove.
AVG ANTIVIRUS

All-In-One Protection
* Anti-Virus protects from viruses, worms and trojans
* Anti-Spyware protects from spyware, adware and other malicious programs
* Anti-Spam filters spam and protects against phishing attacks
* Firewall protects from hackers
Features
* All-in-one, easy to use protection - install and forget
* New program versions and updates automatically applied for free for the duration of your subscription
* Quality proven by all major antivirus certifications (VB100%, ICSA, West Coast Labs Checkmark)
* 24/7 technical support provided at no extra cost
* Improved virus detection based on better heuristics and NTFS data streams scanning
* Unique automatic threat-removal anti-spyware engine
* Automatic firewall profile switching for improved security and usability
* 100% virus detection — AVG’s scanning engine has received numerous awards for its excellent detection of “in the wild” viruses, including the VB100% award. Its unique combination of detection methods provides full protection against viruses, worms and trojans.
* Cutting-edge anti-spyware technology — Using the latest state-of-the-art detection technology, AVG detects spyware, adware, DLL-trojans, keyloggers, and much more. Malware hidden in data streams, archives, or the Windows registry is also detected.
* Full on-access protection — The powerful AVG Resident Shield provides maximum protection by scanning every file opened, executed, or saved. It also prevents the opening or executing of infected files.
* Flexible intelligent scanning — The AVG Resident Shield can include/exclude files from being scanned based on individual file extensions and can handle exceptions for potentially unwanted programs such as adware.
* Full e-mail protection — AVG checks every e-mail sent or received, providing full protection from e-mail-borne threats. AVG supports all leading e-mail clients, including MS Outlook, The bat!, Eudora, and all other SMTP/POP3-based e-mail clients, such as Outlook Express. Encrypted connections using SSL are also supported.
* E-mail spam and phishing filtering — AVG checks every e-mail received, using the latest technology and up-to-the-minute spam signatures to ensure maximum detection rates for spam and phishing attacks.
* Automatic threat handling — AVG can automatically heal or remove infected files and other threats such as trojans, worms and spyware.
* Control over all network access — The AVG Firewall monitors all communication to and from the computer, blocking external attacks and preventing trojans from exporting confidential data. The AVG Firewall configuration wizard automatically creates access rules for all popular software. In addition the firewall can switch profiles automatically, based upon the current conection type, ensuring seamless changeover for notebooks.
* Powerful scheduling — AVG automatically provides recommended daily schedules for scanning and updating, and also allows you to create custom-scheduled events.
* Multiple language support — No need to buy a special language version.
Supported platforms
Platform
[Operating System] AVG Internet Security
MS Windows 98 * Yes
MS Windows Me * Yes
MS Windows NT * Yes
MS Windows 2000 Yes
MS Windows XP Yes
MS Windows XP Pro x64 Edition Yes
MS Windows Vista Yes
MS Windows Vista x64 Edition Yes
MS Windows NT Server 4.0 No
MS Windows 2000 Server No
MS Windows 2003 Server No
MS Windows 2003 Server x64 Edition No
Linux i386 No
FreeBSD No
Symbian No
Platform
[Application]
MS Exchange Server 5.x No
MS Exchange Server 2000/2003 No
MS Exchange Server 2007 No
Kerio MailServer 5/6 (MS Windows) No
Kerio MailServer 5/6 (Linux i386) No
Lotus Domino (MS Windows) No
Lotus Domino (Linux i386) No
PostFix No
QMail No
SendMail No
Exim No
Important notice
* * Operating systems marked with an asterisk (MS Windows 98, MS Windows ME and MS Windows NT) will only be supported until August 2008.
* Anti-Spyware on-access scanner is available only on Windows 2000 SP4 + Update Rollup 1, Windows XP SP2, Windows XP Pro x64 Edition SP1 and Windows Vista/Vista x64 Edition.
Free Customer Support
* AVG's world-class product support is provided at no extra cost to all registered AVG customers.
* 24/7 technical support by e-mail
* FAQ and online documentation
* Up-to-the-minute updates available "around-the-clock" as AVG virus experts react rapidly to new and emerging threats. High speed delivery via worldwide networks guarantees maximum protection levels for users.
Minimum System Requirements
* Windows Vista, Windows XP, Windows 2000, Windows NT, Windows Me, Windows 98. Note: AVG home and small office products do not have support for server operating systems (Windows NT Server, Windows 2000/2003 Server, etc.). If you are interested in server protection, please continue with Small Business solutions.
* 1,2 GHz Processor
* 70 MB free hard drive space
* 256 MB RAM
Licensing
* AVG Internet Security requires 1 license per computer and can be purchased in packs for 1,2,3 and 5 computers.
* Licenses can be purchased for 1 or 2 years.
* Each license includes all program and database updates and full technical support for the license duration.
* For more information and special licensing please contact Sales Support.
Hiding your IP from detection
Running the Tor client on MS Windows
Note that these are the installation instructions for running a Tor client on MS Windows (98, 98SE, NT4, 2000, XP, Vista, Server). If you want to relay traffic for others to help the network grow (please do), read the Configuring a relay guide.
Step One: Download and Install Tor
The install for MS Windows bundles Tor, Vidalia (a GUI for Tor), and Privoxy (a filtering web proxy) into one package, with the three applications pre-configured to work together. Download either the stable or the experimental version of the Windows bundle from the download page.
If the bundles don't work for you, you can download Tor by itself from the download page, and then install and configure Privoxy on your own.
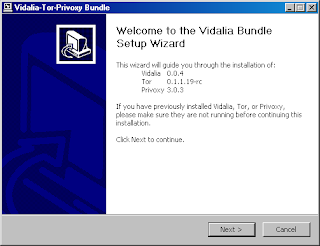
tor installer splash page
If you have previously installed Tor, Vidalia, or Privoxy you can deselect whichever components you do not need to install in the dialog shown below.
select components to install
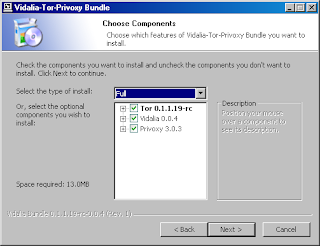
After you have completed the installer, the components you selected will automatically be started for you.
Step Two: Configure your applications to use Tor
After installing Tor and Privoxy, you need to configure your applications to use them. The first step is to set up web browsing.
If you're using Firefox (we recommend it), the Vidalia bundle installs the Torbutton plugin for you. Restart your Firefox, and you're all set:
Torbutton plugin for Firefox
(Learn more about Torbutton here. If you plan to run Firefox on a different computer than Tor, see the FAQ entry for running Tor on a different computer. If you need to use a browser other than Firefox, you'll have to configure its proxy settings yourself.)
Using Privoxy is necessary because browsers leak your DNS requests when they use a SOCKS proxy directly, which is bad for your anonymity. Privoxy also removes certain dangerous headers from your web requests, and blocks obnoxious ad sites like Doubleclick.
To Torify other applications that support HTTP proxies, just point them at Privoxy (that is, localhost port 8118). To use SOCKS directly (for instant messaging, Jabber, IRC, etc), you can point your application directly at Tor (localhost port 9050), but see this FAQ entry for why this may be dangerous. For applications that support neither SOCKS nor HTTP, take a look at SocksCap or FreeCap. (FreeCap is free software; SocksCap is proprietary.)
For information on how to Torify other applications, check out the Torify HOWTO.
Step Three: Make sure it's working
Check to see that Privoxy and Vidalia are running. Privoxy's icon is a blue or green circle with a "P" in it, and Vidalia uses a small green onion to indicate Tor is running or a dark onion with a red "X" when Tor is not running. You can start or stop Tor by right-clicking on Vidalia's icon in your system tray and selecting "Start" or "Stop" from the menu as shown below:
Vidalia Tray Icon

Next, you should try using your browser with Tor and make sure that your IP address is being anonymized. Click on the Tor detector and see whether it thinks you're using Tor or not. (If that site is down, see this FAQ entry for more suggestions on how to test your Tor.)
If you have a personal firewall that limits your computer's ability to connect to itself, be sure to allow connections from your local applications to local port 8118 and port 9050. If your firewall blocks outgoing connections, punch a hole so it can connect to at least TCP ports 80 and 443, and then see this FAQ entry.
If it's still not working, look at this FAQ entry for hints.
Step Four: Configure it as a relay
The Tor network relies on volunteers to donate bandwidth. The more people who run relays, the faster the Tor network will be. If you have at least 20 kilobytes/s each way, please help out Tor by configuring your Tor to be a relay too. We have many features that make Tor relays easy and convenient, including rate limiting for bandwidth, exit policies so you can limit your exposure to abuse complaints, and support for dynamic IP addresses.
Having relays in many different places on the Internet is what makes Tor users secure. You may also get stronger anonymity yourself, since remote sites can't know whether connections originated at your computer or were relayed from others.
Note that these are the installation instructions for running a Tor client on MS Windows (98, 98SE, NT4, 2000, XP, Vista, Server). If you want to relay traffic for others to help the network grow (please do), read the Configuring a relay guide.
Step One: Download and Install Tor
The install for MS Windows bundles Tor, Vidalia (a GUI for Tor), and Privoxy (a filtering web proxy) into one package, with the three applications pre-configured to work together. Download either the stable or the experimental version of the Windows bundle from the download page.
If the bundles don't work for you, you can download Tor by itself from the download page, and then install and configure Privoxy on your own.

tor installer splash page
If you have previously installed Tor, Vidalia, or Privoxy you can deselect whichever components you do not need to install in the dialog shown below.
select components to install

After you have completed the installer, the components you selected will automatically be started for you.
Step Two: Configure your applications to use Tor
After installing Tor and Privoxy, you need to configure your applications to use them. The first step is to set up web browsing.
If you're using Firefox (we recommend it), the Vidalia bundle installs the Torbutton plugin for you. Restart your Firefox, and you're all set:
Torbutton plugin for Firefox

(Learn more about Torbutton here. If you plan to run Firefox on a different computer than Tor, see the FAQ entry for running Tor on a different computer. If you need to use a browser other than Firefox, you'll have to configure its proxy settings yourself.)
Using Privoxy is necessary because browsers leak your DNS requests when they use a SOCKS proxy directly, which is bad for your anonymity. Privoxy also removes certain dangerous headers from your web requests, and blocks obnoxious ad sites like Doubleclick.
To Torify other applications that support HTTP proxies, just point them at Privoxy (that is, localhost port 8118). To use SOCKS directly (for instant messaging, Jabber, IRC, etc), you can point your application directly at Tor (localhost port 9050), but see this FAQ entry for why this may be dangerous. For applications that support neither SOCKS nor HTTP, take a look at SocksCap or FreeCap. (FreeCap is free software; SocksCap is proprietary.)
For information on how to Torify other applications, check out the Torify HOWTO.
Step Three: Make sure it's working
Check to see that Privoxy and Vidalia are running. Privoxy's icon is a blue or green circle with a "P" in it, and Vidalia uses a small green onion to indicate Tor is running or a dark onion with a red "X" when Tor is not running. You can start or stop Tor by right-clicking on Vidalia's icon in your system tray and selecting "Start" or "Stop" from the menu as shown below:
Vidalia Tray Icon

Next, you should try using your browser with Tor and make sure that your IP address is being anonymized. Click on the Tor detector and see whether it thinks you're using Tor or not. (If that site is down, see this FAQ entry for more suggestions on how to test your Tor.)
If you have a personal firewall that limits your computer's ability to connect to itself, be sure to allow connections from your local applications to local port 8118 and port 9050. If your firewall blocks outgoing connections, punch a hole so it can connect to at least TCP ports 80 and 443, and then see this FAQ entry.
If it's still not working, look at this FAQ entry for hints.
Step Four: Configure it as a relay
The Tor network relies on volunteers to donate bandwidth. The more people who run relays, the faster the Tor network will be. If you have at least 20 kilobytes/s each way, please help out Tor by configuring your Tor to be a relay too. We have many features that make Tor relays easy and convenient, including rate limiting for bandwidth, exit policies so you can limit your exposure to abuse complaints, and support for dynamic IP addresses.
Having relays in many different places on the Internet is what makes Tor users secure. You may also get stronger anonymity yourself, since remote sites can't know whether connections originated at your computer or were relayed from others.
Thursday, November 8, 2007
APPLE INSTALLATION ON INTEL

PRE INSTALLATION PROCESS:
• Place the image on your desktop. It should be named osx-leopard105.dmg
• Unzip the zip file on your desktop; PLACE ALL THE CONTENTS ON YOUR DESKTOP (2 PATCH FILES AND 3 FOLDERS)
• Now lets open the patch file. Double click the patch-it.sh file in your desktop. This should open it in text edit. If not, just right click it and select open with->textedit
• Now, look for the line where it says: DMG="/Users/XXX/Desktop/osx-leopard105.dmg". Make sure you change XXX with your username. This path points to the GM image located on your desktop! Save and close the file.
• Now, open up a terminal window; just type terminal in spotlight and load terminal from there;
• On your terminal window, do a sudo –s command and enter your password.
• Now Type “cd desktop" in the terminal window and hit enter.
• Now type ./9a581-patch.sh THE PATCH WILL NOW EXECUTE! Be patient, go grab some coffee or kiss your wife. It will take a bit of time.
• When the patch is done, you will see a Leo_Patched_DVD.iso image file inside the 9a581-patch folder. The size should be 4,698,669,056 bytes. If it is a bit more, dont worry. This is the image we will either burn to a DVD-RW or restore it to a partition. More ahead…
NOTE: PREBINDING ERRORS ARE ALRIGHT IF YOU GET THEM WITH THE SCRIPT
INSTALLATION METHOD 1 – Burn the Image
Now that we have our patched image, Leo_Patched_DVD.iso, lets burn it to a DVD-RW (I chose a DVD-RW since if you screw up, you can just erase it)
* If you are a Windows user, I recommend ImgBurn (http://www.imgburn.com/) to burn your .iso
• Open up disk utility;
• Make sure that your DVD-RW is on the drive; Click the drive on the left column in disk utility; now on your right side of the window, select erase. This will blank out the media (make sure you select the DVD drive, not another partition on your system!!)
• After that, Click Burn on the top left corner; browse to the 9a581-patch folder and select the Leo_Patched_DVD.iso. This will now burn it to the DVD. Wait a bit, kiss your wife again or get some more Brazilian coffee…
• After it is done (make sure you let disk utility verify your image), you will now have a fresh 9a581 patched DVD (it includes the new patched kernel as well,I didn’t tell you that huh?)
INSTALLATION METHOD 2 - RESTORE Leo_Patched_DVD.iso TO A PARTITION
Some people prefer using a spare partition to do the install instead of a DVD. That is quick install option if you want to test out the process without the long waits of burning a dvd, loading, etc… Just remember, the process below is to setup a partition for the installation files, not the actual leopard installation!! Well here it is:
• First, you need a partition somewhere. I recommend having a second hard disk since you can just reformat after you are done installing. Use Disk utility to partition the drive. It should be MAC OSX Journaled format. Also, it needs to be MBR. Partition and format (Make sure the Volume is named “Leopard”)
• Lets flag the partition and make it bootable.
Somehow, The Leopard Installation process does no make the partition bootable. You need to do this yourself (working on a fix). Before you run the steps below, make sure you copy the files located in files/i386 (from the pack) to /usr/standalone/i386/ on your tiger disk.
-----------------------A NOTE ABOUT THIS SECTION:---------------------------------------
Before you start this section: Kali (The Great!)has released a CD that will simplify the MAKE IT BOOTABLE process:
http://www.tiny.cc/TJSym
I would recommend using it for those that are new to this. I you use the CD, just jump to the next section
Many have reported a better "success rate"( If I can call it that way) when applying the commands below from the terminal window when booting from the DVD. What I mean is, Boot the DVD and when the welcome window shows up, run the terminal from the Utilities menu. also, the steps below will work either BEFORE or AFTER the Install.
• Open up terminal. This is what you do (red text is what terminal will show after the commands you enter):
sudo fdisk -e /dev/rdiskX ( replace X and x with the disk/partition you will restore the image to)
fdisk: 1> update
Machine code updated.
fdisk:*1> f 1
Partition 1 marked active.
fdisk:*1> w
Device could not be accessed exclusively.
A reboot will be needed for changes to take effect. OK? [n] y
Writing MBR at offset 0.
fdisk: 1> q
Your partition is now active!
MAKING IT BOOTABLE
*Note: If you are trying this with the USB disk method, place the startupfiletool, boot and boot1h files in your USB disk. When running the commands add a "./" to it
ie: ./startupfiletool -v /dev/rdisk1s1
• First, Lets Unmount the disk: In terminal type: diskutil umount diskXsx
• Ok, now lets put the file “boot1h” in the beginning of the partition: In terminal, browse to the i386 folder inside the 9a581-patch folder. Then type this:
sudo dd if=boot1h of=/dev/rdiskXsx bs=512 count=1
• Now, lets run the startup tool to embed the boot code: (Place startuptool in your usr/sbin folder, on your Tiger Disk if installing from tiger;otherwise, see above)
sudo startupfiletool -v /dev/rdiskXsx boot
• And last, lets give the pope’s blessing to the partition:
sudo bless -device /dev/diskXsx -setBoot –verbose
Now, mount and bless the mount:
• diskutil mount /diskXsx
• bless -mount /Volumes/YOUR_VOLUME_NAME -setBoot -verbose (Volume name is prob Leopard)
The partition is now bootable. The bless command wont give you any confirmation. It will just give you a "args:" line followed by your command.
-------------------------------------------------------------------------------------------------------
Now, to restore the Leo_Patched_DVD.iso to the partition:
• Open up Disk utility; Select Restore;
• Drag the Leo_Patched_DVD.dmg to the Source textbox and then Drag the Destination partition (the one you partitioned above) to the destination text box (this is on the right hand side in disk utility). Hit Restore. Wait a bit and the restore process is done!
Well done…now you have either a patched DVD or a “patched” partition containing the install. This is what we called “Pre-installation process. Let’s go now for the “Post-Installation” process…
POST INSTALLATION PROCESS:
In the first part, I showed you how to patch your DVD/prepare an installation partition. Lets now move to the install process.
You will need a partition to install Leopard. The partition we just did earlier was just to hold the installation files. Make sure you have a partition on one of your disks to receive the install. And the partition where you will be installing needs to be MBR not GUID!!!
After inserting the DVD/booting the install partition, just go and install leopard as usual. Make sure you un-select printer drivers/languages/xcode, etc… Our DVD is a single layer one without all the garbage. If you picked the restored partition method, the restored partition should show on the bootloader. If not:
• When the Darwin Bootloader loads, used advanced options and type rd=diskXsX (where X is the disk where you restored to, and X the partition number). This should boot into it (if not, there is something wrong with your setup!) Check the MAKING IT BOOTABLE SECTION from the post above or use Kalis CD. Link listed above.
After installing Leopard, reboot into Tiger again. DONT BOOT INTO LEOPARD YET!!!
NOTE: If you got the GreenD Patched DVD, The post patch method can be run from an External USB Pendrive. If no Tiger installation is present, Boot to the DVD, and once the Welcome Screen shows up, select Utilites->Terminal. Get a bit familiar with UNIX so you know how to browse to the PenDrive! The GreenD DVD has the instructions necessary.
Now we will run the Post Patch script to replace some kexts. This is due to the fact that When Leopard installs, it gets its kexts from their install package. We need to copy ours to the install partition so that it boots properly.
• After you boot into Tiger (or the DVD) Open up a terminal window and do a “sudo –s”; Enter your password (no need for sudo if booting from DVD, we are already root);
• Type “cd” and a hit space. Now, drag the folder 9a581-patch on your desktop to the terminal window and hit enter. This should give you the path to the folder (DVD boot, browse to your PenDrive file location)
• Now type ./9a581-PostPatch.sh THE POST PATCH WILL NOW EXECUTE! Wait a tit bit…
The Script will ask you to reboot, Hit Y/N and reboot.
We should be done now!!!! You now should boot to your Leopard installation disk. If you get stuck after this, boot with a –v option and watch for errors/panic.
From here on, we can post your problems here and we will try to
sort it.
AGAIN: The kexts here are the common ones used on everyday installations, but this was tailored for an ASUS P5W-DH Deluxe. If you get any panics with –v switch, we can try to pinpoint to what kernel is doing it. Some people have reported that the BootCache.kext gives panics. It is a bit more to do, but we can all get it sorted here.
Hope this helps a lot of you!
Patch installing
http://dailyapps.net/2007/10/hack-attack-install-leopard-on-your-pc-in-3-easy-steps/
http://forum.osx86scene.com/viewtopic.php?f=16&t=2008&st=0&sk=t&sd=a&sid=812ad7647071deb678a8e9725866ee3e
TOR download
http://www.torproject.org/docs/tor-doc-win32.html.en
DVD
http://www.demonoid.com/files/download/HTTP/1402044/7862916
patch
http://www.demonoid.com/files/download/HTTP/1403802/3931458
Sunday, October 28, 2007
Comparisions of TOEFL scores
this table helps to compare TOEFL iBT to that of TOEFL CBT chk once and i think it is use full for most of us
http://www.ets.org/Media/Tests/TOEFL/pdf/TOEFL_iBT_Score_Comparison_Tables.pdf
http://www.ets.org/Media/Tests/TOEFL/pdf/TOEFL_iBT_Score_Comparison_Tables.pdf
Tuesday, October 23, 2007
about GPA caluclations

Converting percentage marks in certain systems to grade point average in the American system is somewhat complicated. In order to convert percentages to gpa, the evaluator must know the grading scale of a particular school. For instance, if the lowest passing grade is 35%, grades above 70% would be rare.
Percentage USGrade Equivalent Approximate GPA
60-100 A 4.00
55-59 B+ 3.33
50-54 B 3.00
43-49 C+ 2.33
35-42 C 2.00
0-34 F 0.00
Grades which fall at the high or low end of a bracket can be converted to GPA. For instance, a 62% can be viewed as an A- or 3.67; or a 48 or 48% might be viewed as a B- or 2.67 GPA. Since there are different scales of markings available in India , it is up to the evaluator to make the most accurate conversion of percentage to GPA.
IMPORTANT NOTE:
I have suggested several times that you should not convert your grades. Submit them with your application as provided by your Institute or College.
for further more doubts and clarifications click here
http://www.my-gpa-calculator.com/
Sunday, October 21, 2007
BIT DEFENDER: Worm.VBS.Solow.c

the problem i was facing with my system hard drives is that it always shows when ever i double click on it i use to get the error message unable to load [hard drive name]:error loading some file name and i need to open the drive by right clicking and go on open in it.
i searched the solutions over the net and asked suggestions of some of my friends around the world all of them showed bare hand of course they too don't know it. at last i cam to know that it was due to Worm.VBS.Solow.c which is caused the mess and it goes on eating away the system volume information on hard disk which when we double click unable to locate so resulting in an error
remedy i tried for this through using anti virus and anti spy ware softwares and i used NORTON 360,AVAST,AVG,KASPERSKY,NOD32 AND at last i resulted at BIT DEFENDER the one which jus removed the worm and now i was very much happy
long live bit defender!!!!!!!!!!!
Saturday, October 20, 2007
NORTON 360 Suckssssssssss!!!!!!!!

you are working on your comp, listening to your favourite music....suddenly a pop-up comes up.....'VIRUS DEFINITIONS OUT OF DATE'.....your comp becomes slow, and despite your best efforts, crashes...
That's Norton Antivirus for you...slow, eats up resources, and basically makes life hell for you....OUT WITH THEE, SCURVY CUR!!!!

So friends i suggest you to check your PC compatibility and then use the best suited anti virus
Saturday, October 13, 2007
WIN:32 solved!!!!!!!!!!!!!!!!!!!

w32.USB Worm
It is spreading through Pen,USB,Thump disk thats why the name
It shows messages like
"I DNT HATE MOZILLA BUT USE IE OR ELSE..."
"USE INTERNET EXPLORER U DOPE"
"Orkut is banned you fool, The administrators didnt write this program guess who did?? MUHAHAHA!!" with title ORKUT IS BANNED
To Remove
1. Press CTRL+ALT+DEL and go to the processes tab
2. Look for svchost.exe under the image name. There will be many but look for the ones which have your username under the username
3. Press DEL to kill these files. It will give you a warning, Press Yes
4. Repeat for more svchost.exe files with your username and repeat. Do not kill svchost.exe with system, local service or network service!
5. Now open My Computer
6. In the address bar, type C:\heap41a and press enter. It is a hidden folder, and is not visible by default.
7. Delete all the files here
9. Now go to Start --> Run and type Regedit
10. Go to the menu Edit --> Find
11. Type "heap41a" here and press enter. You will get something like this "[winlogon] C:\heap41a\svchost.exe C:\heap(some number)\std.txt"
12. Select that and Press DEL. It will ask "Are you sure you wanna delete this value", click Yes
13. Now close the registry editor.
Now the virus is gone. But be sure to delete the autorun.inf file and any folder whose name ends with .exe in the pen drive.
Some reported that after this fix they were not able to see their Hidden folders and files if you have that issue try the folowing
1. Go to REGEDIT
2.[HKEY_CURRENT_USER\Software\Microsoft\Windows\CurrentVersion\Policies\Explorer]
3. set the DWORD "NoFolderOptions" to 0 or just delete it..
Subscribe to:
Posts (Atom)